Hi everyone! Happy St. Patricks Day! (I'm totally slacking today!) I made this layout yesterday and decided to try something different for the title. I used plain shriky-dink "paper," cut it out with my cricut, colored with my alcohol inks and finally shruk them with my heat gun. I know they're not perfect, the words didn't want to cooperate with me too much while I shrank them, but I decided to use the title anyhow.
The word Fancy, was stamped with an alphabet set I have. This is my daughter's favorite thing to say, so it had to be on here!
The paper and tag are from a collection by Basic Grey. I lightly brushed clear glossy accents around the edges of the turquoise mats and then sprinkled turquoise glitter on it before it dried, I just wanted to add a little sparkle around the pictures. I also hand pleated some light blue silk ribbon to the photo in the picture above. This picture of my daughter was taken at the New Year's Eve party where she was set up to meet her new boyfriend. He gave her this picture, complete with the note, in a beautiful frame for Valentine's Day. I scanned it and made a copy of course!
Remember, we have a special Blog-Birthday drawing coming up next week. I'll be giving away a 3 Birds on Parade cartridge. Please see this post for more info. So far we only have 3 names in the drawing...great odds there girls!!!!
Have a super fabulous St. Patty's Day!
Showing posts with label Cricut. Show all posts
Thursday, March 17, 2011
Sunday, February 27, 2011
Super adorable mini books
Good morning friends! I wanted to show you the mini books I just finished for my two nieces. My brother and sister in law adopted our dear Kate almost exactly 8 years ago. It took them about 2 years from start to finish because they adopted her from China, she was almost 1 when she finally became part of our family. Now this past Christmas they began the process to adopt another daughter, Morgan. She is 11 and from a town local to where they all live. I wanted a special way to welcome Morgan to the family and celebrate the deep friendship she and Kate have already begun. I guess they are inseparable and so silly!
So these are the two different covers to the books. I made the books identical except for the tags on the cover and throughout them. Most of the pattern paper was from Cosmo Cricket Mini Deck called DeLovely. I got two of these mini decks and I adore them! The paper was just great for cutting with. The solids were some left overs from a Basic Grey Urban Prairie stack I had and my usual Core'dinations paper I always have on hand. For the girl's names I took some iridescent white paper I had from Hobby Lobby and went to town on it with my alcohol inks. I just love how they turned out, they are so much prettier in person! I used Gypsy Font to weld their names together, it such a great font for welding! The green paper was punched with a Martha Stewart punch around the page set.
Forever title on this page is from Gypsy Wanderings and embellished with my stickles and a rhinestone of course! The daisy border is from Paper Doll Dress Up. I know you can't tell in this picture but I completely covered this border with white glitter and then added I-Rock jewels to the center of each flower. Crocheted flower was from a stash I've had for years. The center is a basic brad that I glittered. Throughout the books I added double sided blank tags for the girls to write on.
This set of pages is because both girls love music, especially playing the piano and keyboard. Music notes are from Gypsy Wanderings. Again I glittered parts of the notes so they would really stand out.
These pages are in honor of Kate and her chickens. She adores them and they are her pets. Apparently she sits and visits with them quite a bit and now Morgan has joined in on that fun too!
I made the word sweet using Alphalicious and glittered the S just for fun. I think the little chick turned out so sweet, couldn't you just hug her? She's from Create A Critter. Her wings are glittered and her beak and legs were cut with the Core'dinations glittered cardstock-that stuff is so fantastic and easy to cut! Of course Chickie's eyes are more rhinestones.
This set I decided to just make glittery and girly. Ribbon is some I picked up from Walmart, it is so pretty! Of course I added rhinestones to the ribbon and picture mats. I also stickled the edges of the paper flowers for some extra sparkle. One can never have enough sparkle I say!
Kate and Morgan both love horses so this is in honor of that love. What young girls wouldn't want a pink sparkle pony? I stickled the mane, tail and hooves of the horse and glittered her bandanna. This horse is from Create A Critter, isn't she FAB?! All the cuts and embellishments in these books are strategically pop dotted so the girls can attach their pictures with out having to remove anything.
And finally, the back cover...so exciting isn't it?! This was also the first project I made using my new Cinch. It worked like a dream and I am so excited to have a different way to bind my fun little projects now.
I hope you all have a very blessed day!
So these are the two different covers to the books. I made the books identical except for the tags on the cover and throughout them. Most of the pattern paper was from Cosmo Cricket Mini Deck called DeLovely. I got two of these mini decks and I adore them! The paper was just great for cutting with. The solids were some left overs from a Basic Grey Urban Prairie stack I had and my usual Core'dinations paper I always have on hand. For the girl's names I took some iridescent white paper I had from Hobby Lobby and went to town on it with my alcohol inks. I just love how they turned out, they are so much prettier in person! I used Gypsy Font to weld their names together, it such a great font for welding! The green paper was punched with a Martha Stewart punch around the page set.
Forever title on this page is from Gypsy Wanderings and embellished with my stickles and a rhinestone of course! The daisy border is from Paper Doll Dress Up. I know you can't tell in this picture but I completely covered this border with white glitter and then added I-Rock jewels to the center of each flower. Crocheted flower was from a stash I've had for years. The center is a basic brad that I glittered. Throughout the books I added double sided blank tags for the girls to write on.
This set of pages is because both girls love music, especially playing the piano and keyboard. Music notes are from Gypsy Wanderings. Again I glittered parts of the notes so they would really stand out.
These pages are in honor of Kate and her chickens. She adores them and they are her pets. Apparently she sits and visits with them quite a bit and now Morgan has joined in on that fun too!
I made the word sweet using Alphalicious and glittered the S just for fun. I think the little chick turned out so sweet, couldn't you just hug her? She's from Create A Critter. Her wings are glittered and her beak and legs were cut with the Core'dinations glittered cardstock-that stuff is so fantastic and easy to cut! Of course Chickie's eyes are more rhinestones.
This set I decided to just make glittery and girly. Ribbon is some I picked up from Walmart, it is so pretty! Of course I added rhinestones to the ribbon and picture mats. I also stickled the edges of the paper flowers for some extra sparkle. One can never have enough sparkle I say!
Kate and Morgan both love horses so this is in honor of that love. What young girls wouldn't want a pink sparkle pony? I stickled the mane, tail and hooves of the horse and glittered her bandanna. This horse is from Create A Critter, isn't she FAB?! All the cuts and embellishments in these books are strategically pop dotted so the girls can attach their pictures with out having to remove anything.
And finally, the back cover...so exciting isn't it?! This was also the first project I made using my new Cinch. It worked like a dream and I am so excited to have a different way to bind my fun little projects now.
I hope you all have a very blessed day!
Thursday, February 24, 2011
Playing with alcohol ink
In my bix box 'o goodies I got last week were four bottles of Tim Holtz Alcohol Inks...I've been itching to play with these for a while now. Today I got myself a big piece of freezer paper (who needs those pricey craft mats anyhow?!), my ink, some metal do-dads, plastic buttons, and flowers I cut with my dear Love Bug. Yes, I cut some flowers from a book page or two. This was a book that had fallen apart and I wanted to give this a go too. Cutting up book pages is a little fickle to say the least. I know I've seen people on the internet coloring paper flowers with this ink, but for the life of me, I can't find them now. So I resorted to experimenting myself. I ended up spraying the freezer paper with some water, added a few drops of the ink and then swirling my flowers in said concoction. The more compact flowers were much easier to work with, they didn't tear like the ones with long petals. I crumpled the flowers as I dried them with my heat gun and then I added a spritz or two of my homemade glitter mist. I dried the flowers again. I'm pretty happy with my outcome. I'm not thrilled with how my buttons turned out, sure that will take more practice. I'm loving the way my silver brads were colored to match my flowers, so pretty and vibrant. To make the brads work I put them in a little foam brad holder I had (the ones the fancy brads come in from the store) and I dropped one drop of ink on to each brad then let them dry, easy! I tried other methods too, but this seemed to work the best for me.
Sorry I've been MIA latley, I work on my nieces mini books this past weekend, they are almost done and I'm thrilled with them! Pictures will follow soon!
Have a blessed day!
![]() |
| Yes, I know my brads are off center...that is common with me unfortunately! |
Have a blessed day!
Labels:
Alcohol Ink,
Cricut,
Flowers
Wednesday, December 8, 2010
Recipe Card, Bags, and Tags Oh My!
Hi again! I've been very busy with my Love Bug and Chloe for the last few days, they are loving all the attention they're getting!
First, here is a recipe card I made yesterday. It was for a challenge about favorite holiday recipes. Well the reining champ here at our house has been these yummy little cookies officially known as Raspberry Pinwheels, but Becky renamed them a few years ago to be now called "Annabells." My mom always made them at Christmas time. Last year my mom made some while she was visiting and Mike fell in love with them again, I ended up making another huge batch of them just for him. Anyhow, they are a huge favorite here so I thought I would make a special recipe card to hold this beloved cookie.
The card base was cut with From My Kitchen, using this cool double sided paper. Apron was from Nifty Fifties, the cherries were omitted from the pockets and I added holly from the top of the Christmas Pudding cut in Winter Frolic. Annabells was cut with Gypsy font and welded on Chloe.
The back of the card is the recipe. I printed this out on my printer and just cut it to size.
On to another project...a couple weeks ago I made Susan's two youngest daughters matching dresses for their American Girl dolls (it's been too long since I've made these, I miss it so much!) Well of course I couldn't just wrap the dresses like a normal person, I HAD to make little shopping bags for them. It was quite a challenge making the bags large enough. Even with 12 x 24 paper, the bags have so many odd size pieces. I finally figured out how to rotate the bags on Chloe enough to get a good size bag.
This is Allie's bag, I decided to cut off the handles and use double sided satin ribbon for the handles, more like a little boutique bag. I just love the little kids on Winter Frolic so I just had to make the girls and put them on their bags. Bags were cut with Tags, Bags, Boxes and More.
This is Deanna's bag. When I first saw this cut it screamed Deanna to me. I have been waiting for an excuse to make this one for her. ( I realized while making these bags, I have now created three versions of these two sweet girls in just the past year, crazy! Spring, Summer, and Winter.)
I made cute tags for the other side of these bags, each girl has her name on it and it is tied on with some pink ribbon. Their names were done with the Gypsy Font once again, and the tags are from Gypsy Wanderings.
Have a blessed day!!!!!
First, here is a recipe card I made yesterday. It was for a challenge about favorite holiday recipes. Well the reining champ here at our house has been these yummy little cookies officially known as Raspberry Pinwheels, but Becky renamed them a few years ago to be now called "Annabells." My mom always made them at Christmas time. Last year my mom made some while she was visiting and Mike fell in love with them again, I ended up making another huge batch of them just for him. Anyhow, they are a huge favorite here so I thought I would make a special recipe card to hold this beloved cookie.
The card base was cut with From My Kitchen, using this cool double sided paper. Apron was from Nifty Fifties, the cherries were omitted from the pockets and I added holly from the top of the Christmas Pudding cut in Winter Frolic. Annabells was cut with Gypsy font and welded on Chloe.
The back of the card is the recipe. I printed this out on my printer and just cut it to size.
On to another project...a couple weeks ago I made Susan's two youngest daughters matching dresses for their American Girl dolls (it's been too long since I've made these, I miss it so much!) Well of course I couldn't just wrap the dresses like a normal person, I HAD to make little shopping bags for them. It was quite a challenge making the bags large enough. Even with 12 x 24 paper, the bags have so many odd size pieces. I finally figured out how to rotate the bags on Chloe enough to get a good size bag.
This is Allie's bag, I decided to cut off the handles and use double sided satin ribbon for the handles, more like a little boutique bag. I just love the little kids on Winter Frolic so I just had to make the girls and put them on their bags. Bags were cut with Tags, Bags, Boxes and More.
This is Deanna's bag. When I first saw this cut it screamed Deanna to me. I have been waiting for an excuse to make this one for her. ( I realized while making these bags, I have now created three versions of these two sweet girls in just the past year, crazy! Spring, Summer, and Winter.)
I made cute tags for the other side of these bags, each girl has her name on it and it is tied on with some pink ribbon. Their names were done with the Gypsy Font once again, and the tags are from Gypsy Wanderings.
Have a blessed day!!!!!
Thursday, October 28, 2010
Sympathy Card and Exciting News
Hi everyone! Sorry I've been MIA for a couple of weeks. It's been buisy around here.
Here is a card I just made for my Uncle's wife, he just passed away this past Saturday. We all knew it was going to happen very soon, but it still is very hard for her right now. He was my mom's older brother.
I made this card using my new Gypsy I won a few weeks back. I am so in love with her, she's named Cloey. I used a layered decorative element from Gypsy Wanderings for the front of the card. The Peace was from Cindy Loo. I pop dotted the inner layers to give the front of the card a little dimension and I also used my Cuttlebug to add texture to the mat on the front. The sentiment was one I found online and it really seemed to fit this situation. We are all happy Uncle Tim is no longer battling cancer and is in Heaven where he is at peace. I printed this off on my computer with a wonderful font I found the other day.
In other news, I am almost done with my Spencer word book. I feel like I've been working on this book forever, but I really wanted to take my time with this project and not rush it. I first starting making the book as a memorial of Spencer because he had a terminal brain tumor that was growing again. Well we just found out the other day all the growth on his original tumor has gone away! No treatment of any kind this time! It is a divine miracle and we are all beside ourselves with excitement!!! He still has his original tumor, but the growth is gone! Hopefully soon I can post pictures of his book, I can't wait to give it to his mom!
Hope you all have a blessed day!
Here is a card I just made for my Uncle's wife, he just passed away this past Saturday. We all knew it was going to happen very soon, but it still is very hard for her right now. He was my mom's older brother.

I made this card using my new Gypsy I won a few weeks back. I am so in love with her, she's named Cloey. I used a layered decorative element from Gypsy Wanderings for the front of the card. The Peace was from Cindy Loo. I pop dotted the inner layers to give the front of the card a little dimension and I also used my Cuttlebug to add texture to the mat on the front. The sentiment was one I found online and it really seemed to fit this situation. We are all happy Uncle Tim is no longer battling cancer and is in Heaven where he is at peace. I printed this off on my computer with a wonderful font I found the other day.
In other news, I am almost done with my Spencer word book. I feel like I've been working on this book forever, but I really wanted to take my time with this project and not rush it. I first starting making the book as a memorial of Spencer because he had a terminal brain tumor that was growing again. Well we just found out the other day all the growth on his original tumor has gone away! No treatment of any kind this time! It is a divine miracle and we are all beside ourselves with excitement!!! He still has his original tumor, but the growth is gone! Hopefully soon I can post pictures of his book, I can't wait to give it to his mom!
Hope you all have a blessed day!
Labels:
Cindy Loo,
Cricut,
Gypsy,
Gypsy Wanderings
Sunday, October 3, 2010
Just for Fun
Happy Sunday everyone! Today is our son's 14th birthday! How did we celebrate? He played his Halo game all day and I've been crafty. Poor sweet hubby has been at work for like almost 2 days straight.
Anyhooo....here's a fun little "library card" I put together this afternoon for a Cricut challenge. I've been wanting to make this since I got the Sentimentals cartridge a couple months ago.
I made this with my dear daughter in mind. She LOVES books and ink pots. I know it's a little over the top for a library card, but oh well, I love it! Just so happens the back side of the pink and black diamond paper had a little library book tag, how cool was that?! All the cuts are from Sentimental. The library card pocket originally had a fleur-de-lis cut out on it, I hid that in Design Studio and cut out the ink pot separately.
Thanks for looking!
Labels:
Cricut,
Design Studio,
Library Card,
Sentimentals
Friday, August 20, 2010
Sand on a Layout???
This is a layout I did recently from a short business trip to Florida. I decided to cover my little sand castle with some sand a dear friend brought me back from Hawaii years ago (yes, I'm crazy for hauling this sand around with me all these years, but look it paid off!) I tried cutting the sand castle from sand paper first. That worked ok, although it messed up my Cricut blade. The sand paper just lacked that certain something I was looking for. After I cut the sand castle out of a light brown I ran it through my Xyron upside down and then sprinkled my sand over it, Ta-Da! A sand castle! I also had just recently purchased some little glass like adhesive tiles from Michael's, they were the finishing touch I think. The word Florida was cut with Lyrical Letters and welded in Design Studio. The other cuts on these pages were made with Create a Critter. I also covered the little red crab with Tim Holtz Fried Brick Distressed Embossing Power. He's now rough and bumpy.
Hope you have a great weekend!
Labels:
Create a Critter,
Cricut,
Embossing,
Lyrical Letters,
Sand
Friday, August 13, 2010
How Does a Cloud Become Dirt???
Happy Friday everyone!!! I for one, am glad the week is almost over, it's been crazy and HOT here! Here's a layout I did recently showing the before and after when we put rock into our flower beds. While I was making this I knew I really wanted a mound of dirt or rocks. Now do you think there will actually be a Cricut cut for that? Noooo! Well for a brief moment I had a revelation, I decided to use a fluffy cloud for my dirt. It worked so beautifully and I was excited! This was also my first layout I used my sewing machine on as well. I just did a regular straight stitch around the edge of both background papers. I really like how this layout turned out.
The Tree and bird are from Cindy Loo. The wheelbarrow and shovel are from Handy Man Lite, I welded the words using Robotz in Design Studio, and the dirt is a cloud from Create a Critter.
Hope you all have a great weekend!
The Tree and bird are from Cindy Loo. The wheelbarrow and shovel are from Handy Man Lite, I welded the words using Robotz in Design Studio, and the dirt is a cloud from Create a Critter.
Hope you all have a great weekend!
Labels:
Cindy Loo,
Create a Critter,
Cricut,
Handy Man Lite,
Nursery Rhymes
Saturday, August 7, 2010
Flower Pot Card
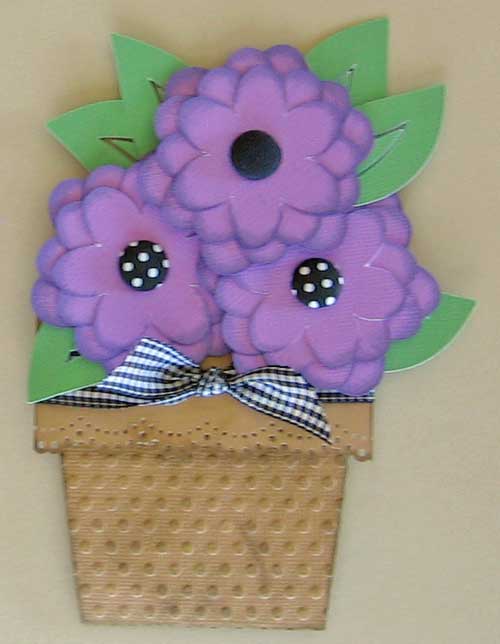
So this is a card I scrap-lifted from Yvette on the Cricut message board. She got it from Split Coast Stampers I believe. I saw this card and just had to make it!
The flowers were made with Paisley, each flower was cut 4 times at 1/4 inch smaller each time. I then inked them on the tips with some Ranger Ink, Concord Grape. The leaves were cut using Lyrical Letters (it's actually a tulip cut I believe.) Flower pot was cut with my paper cutter and embossed with my Cuttlebug. Flower centers are fabric covered brads from Hobby Lobby. All paper was of course, Core'dinations.
This is actually a very fun and easy card to make, let me know if you decide to make one too...I'd love to see it!
The flowers were made with Paisley, each flower was cut 4 times at 1/4 inch smaller each time. I then inked them on the tips with some Ranger Ink, Concord Grape. The leaves were cut using Lyrical Letters (it's actually a tulip cut I believe.) Flower pot was cut with my paper cutter and embossed with my Cuttlebug. Flower centers are fabric covered brads from Hobby Lobby. All paper was of course, Core'dinations.
This is actually a very fun and easy card to make, let me know if you decide to make one too...I'd love to see it!
Labels:
Core'dinations,
Cricut,
Lyrical Letters,
Paisley
Tuesday, July 6, 2010
More Projects Brought To You By the Color RED!
Here are the other projects I did over the weekend and yesterday.
My daughter's favorite color right now is red (boy I've trained her right!) This is the gift card holder I made her, using Cindy Loo. The gift card was one of the big selling points for me when I finally decided to get this cart. The front of the card is decorated with flourishes cut from the same cartridge.
This is the little flower pot holder ??? from Cindy Loo as well. I made it to hold some cash we gave DD. She asked this morning, "Why didn't you just put the cash in a card like everyone else?" (Teasing me of course!)
I responded by telling her she has a crafty momma and that's just not possible! :) I really adore this little holder and can't wait to make many, many more! Oh, I also used Design Studio to weld the square doily from Cindy Loo on to the front, I really love how this looks!
Finally, last but not least, here is a tool box card I made for my dad's birthday next week. He is a former mechanic and all around handy guy. When I saw this toolbox cut on the Handy Man Lite cartridge I instantly thought of Dad. Again I made this one in design studio. I thought it was going to be such a quick card, but my original paper sections did not agree and there was much tearing of paper, not good! This just reinforced another one of my "golden rules" of crafting. Do NOT try to cut paper you already know does not like you! Enough said!
Well that is a wrap up of all my birthday madness for the past week (not to mention the color red!) I think I'm good for a bit now.
Oh, and here's another bit 'o wisdom from me to you....don't put pictures of gifts or cards on your blog if the recipient is a follower! :) My daughter is a follower to this blog, but I didn't think she ever really looked at it. When I gave her they typewriter card today she admitted she had seen it on the blog already! OOOOPS!! Live and learn!
See you all soon,
My daughter's favorite color right now is red (boy I've trained her right!) This is the gift card holder I made her, using Cindy Loo. The gift card was one of the big selling points for me when I finally decided to get this cart. The front of the card is decorated with flourishes cut from the same cartridge.
This is the little flower pot holder ??? from Cindy Loo as well. I made it to hold some cash we gave DD. She asked this morning, "Why didn't you just put the cash in a card like everyone else?" (Teasing me of course!)
I responded by telling her she has a crafty momma and that's just not possible! :) I really adore this little holder and can't wait to make many, many more! Oh, I also used Design Studio to weld the square doily from Cindy Loo on to the front, I really love how this looks!
Finally, last but not least, here is a tool box card I made for my dad's birthday next week. He is a former mechanic and all around handy guy. When I saw this toolbox cut on the Handy Man Lite cartridge I instantly thought of Dad. Again I made this one in design studio. I thought it was going to be such a quick card, but my original paper sections did not agree and there was much tearing of paper, not good! This just reinforced another one of my "golden rules" of crafting. Do NOT try to cut paper you already know does not like you! Enough said!
Well that is a wrap up of all my birthday madness for the past week (not to mention the color red!) I think I'm good for a bit now.
Oh, and here's another bit 'o wisdom from me to you....don't put pictures of gifts or cards on your blog if the recipient is a follower! :) My daughter is a follower to this blog, but I didn't think she ever really looked at it. When I gave her they typewriter card today she admitted she had seen it on the blog already! OOOOPS!! Live and learn!
See you all soon,
Labels:
Cards,
Cindy Loo,
Cricut,
Handy Man Lite
Friday, July 2, 2010
A Shaped Birthday Card (I sure hope my daughter isn't looking!)
Happy Almost 4th of July Everyone!!!!
I recently got Cricut's Design Studio. It took a little messing around but I think I've got it mostly figured out now. Here is my first try and a shaped card. This typewriter represents my beloved daughter's old typewriter which she has lovingly named "Eleanor." It was so great being able to size the cuts and layers in DS, any size I wanted! Yes, I know the card is rather large, but that's ok. At least I don't have to mail it. Now I'm off to make a kitty shaped card for said daughter to send her grandma, for her b-day is just one day before daughter's.
The typewriter, paper, and letters are from Doodletype. The circles for the keys are from George.
Have a great day!
Labels:
Cards,
Cricut,
Design Studio,
Doodletype,
George
Monday, June 21, 2010
Cards for Soldiers
Last week I joined a Cards for Soldiers group on the Cricut message board. I am so excited because I have wanted to do something like this for a while now. I signed up to make 20 cards this time (June 13th -July 5th.) I've now completed 18 of the 20. Here are a few of them....
I did most of the cards in multiples of 2's, I have many more that I haven't taken pics of yet. I think I finish up this batch with some cute kid birthday cards.
Have a great day!
Scalloped oval is from Storybook and sentiments are from Lyrical Letters.
Embossing is Cuttlebug Swiss Dots
Dog is from Robotz and so is the font
Embossing is Cuttlebug Spots and Dots and sanded paper was Core'dinations
I did most of the cards in multiples of 2's, I have many more that I haven't taken pics of yet. I think I finish up this batch with some cute kid birthday cards.
Have a great day!
Labels:
Cards for Soldiers,
Cricut,
Cuttlebug,
Lyrical Letters,
Paisley,
Robotz
Thursday, June 3, 2010
More Vinyl Projects Coming Soon!
Today I received a wonderful cardboard tube filled with more Cricut Vinyl! Yeah for vinyl! I didn't want to purchase full rolls of vinyl this time so I ordered 12 x 24 pieces from Expressions Vinyl. This is a great way to go if you want lots of different colors and a good price too. I'm gearing up for my next fun project which is decorating my daughter's old 1994 Chevy AstroVan which she has dubbed as the "U.S.S. Enterprise." Of course I'll be cutting that name out for her back window. Not just any color would do, so I ordered some silver metallic vinyl, I've been dyeing to get my hands on this for a while now. As for the rest of the van, I think it will be all flowers and girly. She has given Susan and I permission to do just about anything, yahoo! I thought of continuing the outer space theme, but I decided no. After all, she's putting a girl and a guy wiggly hula doll on her dashboard....oh to be 19 again!
Stay tuned for pictures soon....
Subscribe to:
Posts (Atom)