Friday, April 29, 2011

Happy Fairy Tale Day!

Call me crazy for even posting this today, but I was so enchanted with the Royal Wedding today. I almost didn't get up early to watch it (because we all know how much I love my sleep!) but I did, and it was like watching a real life fairy tale. It was so classic and down to earth, other than the crazy hats, how does someone see around those anyhow? :) So in honor of this historic wedding I thought I'd add this tiara image to the blog today...
Isn't it beautiful?!!! As usual it came from the Graphics Fairy - thank you Karen! She's got the story behind this one on her site


Hope you all have an Enchanted weekend!

Sunday, April 24, 2011

Easter Blessings

Just wanted to wish you all a very Happy and Blessed Easter! We pray you all know the love and sacrifice that makes Easter so special!

Friday, April 22, 2011

Blessed Good Friday and a New Company to Share

I hope you are all having a very blessed day!

I thought today would be a great day to share with you all a wonderful little company Susan found while she was at a book fair a few weeks ago. I want to support Sarah in every way possible because it's not easy running a business, especially at the ripe old age of 19! Let me introduce you to Sarah who owns Pursenalize It. Her main emphasis is on one-of-a-kind completely customized hand made purses. Susan purchased one from her and I have seen it first hand, it's an amazing work of art!!! She also creates other amazing hand made accessories. Well here's the sincher for me, she also makes Jean Pocket Mini Scrapbook kits! I had Susan pick one up for me, it is so well thought out and planned. Sarah doesn't have them on her webstie yet, but I'm told she will very soon. Here are some pictures of my kit....
Sorry this pic is a little blurry! This is how the kit comes...looks like fun!
This is the kit all spread out....patterned and solid 7 x 7 cardstock, cardboard base pages with adorable little hinges sewn to the edge for binding, each page is clearly labeled. Antiqued binder rings. Denim "ribbons" for tying on the rings. Fully lined jean pockets (can't you just see blinging these babies up?!!!) A templet for punching your holes in the hinge, and finally extra pieces of the cardstock for embellishing or what ever! Oh and of course, very clear and detailed instructions for putting the mini together!

close up of the denim pockets and ribbons

Close up of the cardstock, there are also more pieces of 7 x 7 pale yellow cardstock for adhering to the base pages first. They are each labeled and clearly marked.
Close up of the base pages and extra cardstock.


I can tell you that Sarah has put a LOT of time and work into these kits. I can't wait to put mine together, now I just need to find pictures to put in it! This kit is available in different colors/patterns as well, this is the one Susan picked for me. Isn't it the cutest thing EVER! I will be putting a link to Sarah and Pursenalize It on our blog, go give Sarah some love girls!

Wednesday, April 20, 2011

Sweet Mini-Book for my Sweet Goddaughter!

Here is my second mini-book.....I have to say, these are addicting! Connie has been such an inspiration, sharing her ideas and techniques, and of course her passion! So, without further ado....

Here is the cover. I made this for my sweet little goddaughter, Kenna Grace. As you will soon see, she is a treasure!
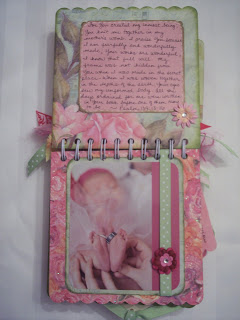
This is the first layout. Look at those tiny little feet! On the journaling box, I wrote out Psalm 139:13-16, one of my favorite passages!
Sweet! This is my cousin, his wife, and baby Kenna. They really are such a sweet family! I love how the pocket turned out on this one!
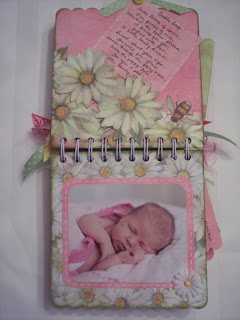
What a sweet baby! Don't you just want to snuggle her?! I love this page. I was having a hard time coming up with a way to fit the poem that I wanted on the page in a way that looked nice on the layout. I came up with the idea for the daisy pocket and putting the tag in at an angle worked much better. It ended up being one of my favorite pages.
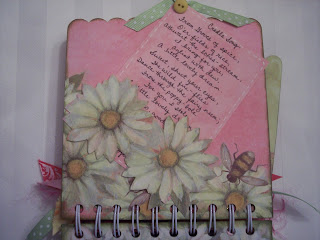
Here's a closer look at the daisy pocket.
I put the clothesline in for Connie! I think it turned out sweet!
If she isn't precious, I don't know what is!!!
Isn't she adorable?!
Here is the final page. And she is Cute as a Button! This book was SO fun to make!
And this is the back cover. All the paper I used is from K&Company. I used cuts from Kate's ABC's, Paisley, Elegant Edges, and Sentimentals. Thanks for letting me share my book! I hope you like it!


Monday, April 18, 2011

New addiction!

Yesterday I found a great method for printing graphics (or what ever) directly on to fabric. Ask my family and Susan, I was beside myself with sheer excitement. You would've thought I won the lottery! Of course I got the idea here and here on the Graphics Fairy website. I've been dieing for a way to incorporate her images into something other than paper. I used the freezer paper method.

Here's my first finished project, a Union Jack pillow for Becky who is obsessed with England. I purposley left the edges of the flag raw so it would unravel a bit. I also antiqued the original image a little in PhotoShop. Here is the original image from the Graphics Fairy.


Here's my second project today. I made my mom a little place mat type thing for her room. This time after I printed the graphic, I applied heat activated vinyl to both sides of the fabric. Yes, I know I could've just printed this on paper, but I'm now fixated on printing onto fabric! Here's a link to the image I used from the Graphics Fairy (again!) The color changed a bit after I applied the film to it.

I get to go play with Susan tomorrow and we're so excited! Hopefully I'll come home with lots of awesome projects to share!

Hope you have a very blessed week!

Monday, April 11, 2011

Pincushion in a mini tart pan

A couple weeks ago I made this sweet little pincushion for myself. I couldn't stand the thought of having a regular red strawberry one!
 Please don't judge my stitching ability! This was the first time I've embroidered in a loooong time!

First, I started out by embroidering this precious little pattern onto a piece of muslin backed with thin batting. The stitching actually went very quickly and I was done with it in a couple of days. I did a simple basting stitch around the perimeter of my muslin circle with  a full 8 strands of embroidery floss, so I could gather it up for finishing.

 Next, I took a little 3 inch (I think!) mini tart pan and glued some mimi pom-pom fringe around the edge with my Fabric-Tac Permanent Adhesive, you could use hot glue too.

Finally, I stuffed and gathered up my little piece of fabric, tied off the strings and glued it into my tart pin with more of my glue. I think I overstuffed this one a bit much, but I still think it turned out very cute! A few days later my mom "commissioned" me to make another one, this time we tea stained the muslin first and used fall colors. Sorry, no pictures of that one just yet.

I found this pattern in a sweet little book called "Bareroots Favorite Embroidery Stitches" at my local quilting shop, Happiness is Quilting. Every time I step foot in their door, my wallet gets nervous!


Hope you all have a very blessed week!

Sunday, April 3, 2011

I'm in love....

with the new Elegant Edges cartridge!!!! I received this cart in the mail on Friday and I'm addicted already! Here was my first project with it...
I used the bird on her perch from the April Showers seasonal cart and welded the So Tweet to it from the Gypsy Font. The scalloped mat is from Elegant Edges.  Amazing what you can design while waiting for an oil change!
Here's the inside, I just had to layer all these papers! I also added some seam binding ribbon I colored with my alcohol inks.

This is one of the beautiful lace/eyelet frames from Elegant Edges as well. I was so giddy as this was cutting! And let me tell you everything I've cut from this cart has been perfect so far!
And finally this eyelet frame as well. I am seriously thinking about just cutting each frame on this cart out just so I can admire them! I have been waiting and hoping for a cart that cuts borders, frames and mats like this for a long time....so thrilled it's here!
The two pictures above are on the layout with the little girl and kitty I showed you a few weeks ago, click here if you want to see it.

Hope you have a very blessed day!

Saturday, April 2, 2011

Time to play show and tell

I have always wanted our blog to be a fun place to share inspiration, great tips, and ideas. So today I'm sharing with you three cards I recently was privileged to receive from friends....

First up a card I unexpectedly received in the mail from Tammy at Scrap Cave Creations. She was the winner of our 3 Birds on Parade drawing. I don't feel I deserve this alone, so dear friend who donated the cartridge this is for you as much as for me! Isn't it adorable?!!! Funny thing is just this week I designed a thank you card with the same theme...must be spring!

Next up is one Susan made me for my birthday. She knows me so well....RED, flowers, ribbon and the necessary BLING! She challenged herself to make a card with out using her Cricut, I think she did a fantabulous job!!!! Love you Susan!!!

And finally, here's another birthday card from my very dear, sweet friend Doris, who lives in WA state. She is the one I credit for getting me into making cards! She has been such a great friend and inspiration to me over the years, and getting one of her cards in the mail just makes my day! Isn't this card so sweet?!!! Love you Doris!!!

Thank you Tammy, Susan, and Doris!!!! You rock and you know these cards will end up in my scrapbook very very soon! I am a very blessed girl!


Have a wonderful weekend!!!